Volleyball Rotations Explained For Beginners
If you’re new to volleyball, grasping the concept of rotations might seem a bit perplexing initially…
It’s not as straightforward as everyone shifting one position after each point; there’s more complexity involved.
But fret not, I’m here to help…
I’ve assembled an easily comprehensible guide that elucidates volleyball rotations, employing diagrams and animations for clarity.
I assure you that all your queries will be addressed, and you’ll grasp this concept in just a matter of minutes!
So Let’s Start!
How Do Volleyball Rotations Work?
The primary aspect to grasp initially regarding rotations is the physical movement around the volleyball court.
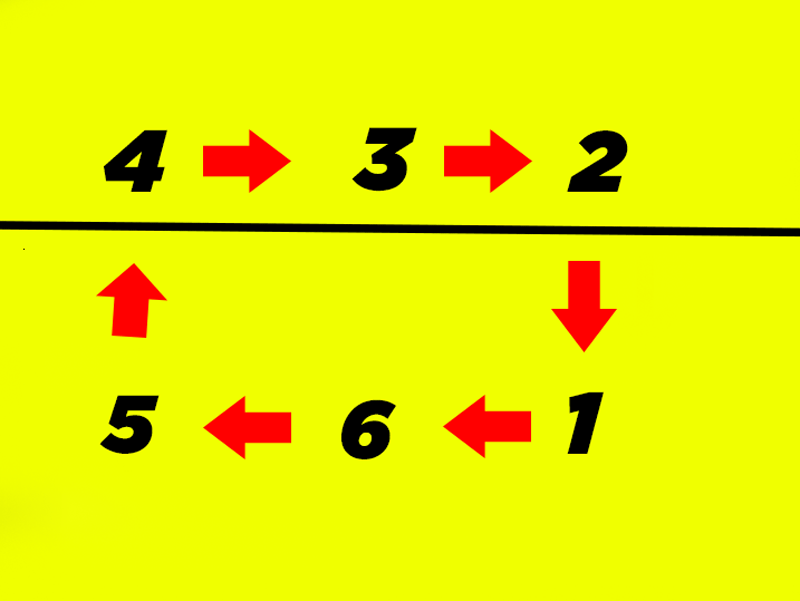
Players Rotate Clockwise Every Time They Sideout
Whenever the opposing team serves, and your team wins the point, each player on your team will rotate clockwise by one position.
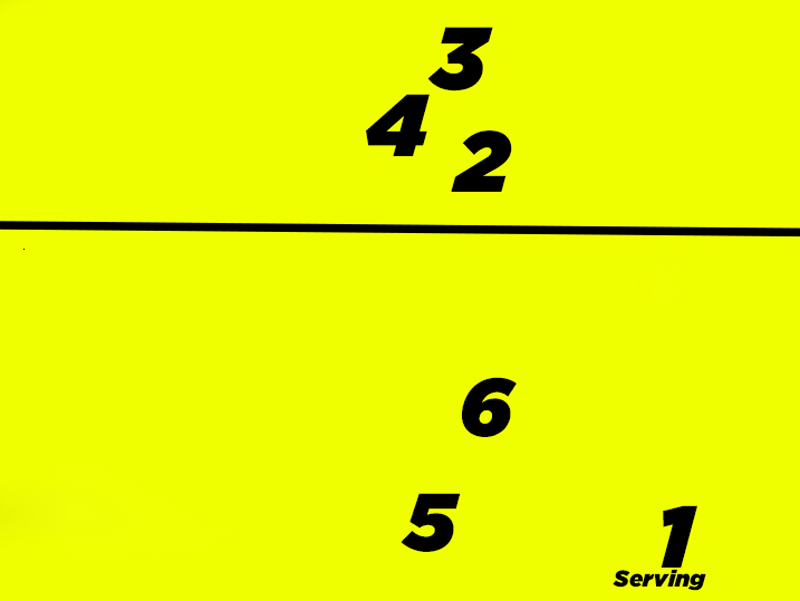
Each of these positions, commonly referred to as “zones on the court,” is designated with a number using a numbering system from 1 to 6.
Position 6: Middle Back
Position 5: Left Back
Position 4: Left Front
Position 3: Middle Front
Position 2: Right Front
Position 1: Right Back

Note that when I mention positions here, I’m specifically referring to these zones on the court or their corresponding numbers, rather than the player positions such as setter, libero, outside hitter, etc.
We’ll delve into those player roles later on.
Volleyball Rules Of Rotation
It’s essential to be aware of several rules to ensure your team avoids any rotational violations.
Volleyball Overlap Rule
The primary aspect to understand is the ‘overlap rule’, which concerns your positioning relative to other players before the ball is served.
Following the serve, you have the freedom to move anywhere on the court, but it’s crucial to adhere to the overlap rule pre-serve.
This rule dictates that you must not ‘overlap’ with the player directly in front of or behind you, nor to your immediate left or right.

To clarify:
1. The player in position 4 must remain in front of the player in position 5 and to the left of the player in position 3.
2. The player in position 5 must stay behind the player in position 4 and to the left of the player in position 6.
3. The player in position 6 must be positioned to the right of 5 and the left of 1, while also staying behind 3.
4. The player in position 1 must remain behind 2 and to the left of 6.
5. The player in position 2 must be positioned in front of 1 and to the right of 3.
6. The player in position 3 must be on the right of 4 and the left of 2, while also staying in front of 6.
When it comes to serve reception, the complexity arises.
Before receiving a serve, it’s crucial to strategically position your players to optimize passing and setting.
You’ll want your best passers in prime positions and your setter near the net to facilitate quick sets.
You can maneuver your players significantly without violating the overlap rule.
In the example below, none of the players break the overlap rule, as indicated by the green animation.
So, what’s happening here?
- The player initially in position 4 has retreated from the net and now occupies the spot where player 5 was.
- Players 5 and 6 have shifted to the right to create space for player 4 to pass.
- The player who began in position 1 (likely the setter) has advanced to the net, positioning directly behind player 2.
- Player 3’s position remains relatively unchanged.
With this setup, our team is well-prepared to receive the serve: three proficient passers are in the back row, and the setter is poised near the net, an ideal location for setting.
The Overlap Rule Applies To The Serving Team Too
Even when your team is serving, it’s imperative to adhere to the overlap rule.
Once the ball is contacted during the serve, the players on the serving team will swiftly move to their base positions.
After Serving, The Defending Team’s Players Move To Their Base Positions
The base positions refer to specific locations on the court where players of different types (setter, outside, middle, libero, opposite) typically position themselves to defend against an attack from the opposing team.
Initially, players on the serving team respected the overlap rule. However, the moment the ball was served, they overlapped with one another and swiftly transitioned into their base positions.
Here’s what the starting positions looked like:

As soon as the ball was served:
1. The libero, originally positioned in position 6, transitioned to his base position, which is typically left back.
2. The opposite hitter, who occupied position 4, promptly moved to his base position, usually front right.
3. The outside hitter, initially in position 2, shifted to his base position, commonly front left.
4. The middle blocker positioned in position 3 was already in his base position, typically front middle.
5. Similarly, the outside hitter in position 5 was already in his base position, usually middle back.
Now, all players have assumed their base positions, fully prepared to defend against any incoming attack.

Player Positions Must Mirror Each Other
On the volleyball court, there are typically 2 outside hitters, 2 middle blockers, a setter, and an opposite hitter.
Each middle blocker must always be directly opposite each other, as must the outside hitters.
Similarly, the setter and opposite hitter must also be opposite one another.
For instance, if you’re an outside hitter and unsure of your position on the court, locate your fellow outside hitter and ensure you’re positioned to mirror them.
Your coach has the flexibility to start a set with players in any position on the court (1-6), as long as the relative positions are mirrored.
For example, if they opt to start with the setter in position 1, the opposite should be in position 4. If the setter begins in position 2, the opposite would be in position 5.
The Libero Can Rotate In & Out At Will
Typically, when the middle blocker rotates into the backcourt after serving and the point is lost, the libero will come on to replace them.
During dead play, the libero can replace any backcourt player without needing to formally ‘sub in’ via the second referee, unlike other players.
As the libero is about to rotate into the frontcourt, they’ll swap back out for the middle blocker, who will then assume their position for the frontcourt rotations.
Different Volleyball Rotations
Apart from the movement around the court, the term “rotation” in volleyball can also denote an offensive strategy employed by a team.
The specifics of each strategy vary depending on whether the setter will be positioned in the front row or back row, as well as the total number of setters utilized.
Each strategy comes with its own distinct advantages and disadvantages.
4-2 Volleyball Rotation
The 4-2 volleyball rotation is considered the simplest strategy, making it ideal for beginners.
This rotation entails utilizing 2 setters who predominantly set from the front row.
It was the first rotation I employed when I began playing volleyball in high school at the age of 13.
6-2 Volleyball Rotation
The 6-2 volleyball rotation is another commonly used strategy, typically employed by intermediate teams.
This strategy involves having 2 setters who exclusively set from the back row, enabling teams to maximize their offensive options.
5-1 Volleyball Rotation
The 5-1 volleyball rotation is considered a more advanced strategy, prevalent at higher levels of volleyball.
This approach entails employing a single setter who rotates across the entire court, participating in both the front court and the backcourt.
5-2 Volleyball Rotation
The 5-2 volleyball rotation is a relatively lesser-known approach, resembling a hybrid between the 6-2 and 5-1 strategies.
This strategy employs 2 setters, with one primarily playing in the front court (typically tall), and the other exclusively playing in the back row (usually shorter).
High School Volleyball Rotations: Best Options?

For younger teams comprising players aged between 10-14, it’s quite common to observe the utilization of a 4-2 rotation.
This basic strategy serves as an excellent starting point, allowing players still learning the rules to enjoy the game of volleyball without the complexities of rotational intricacies like the overlap rule.
As players progress in their development, it’s common to witness teams transitioning to a 6-2 rotation.
This option proves advantageous for high school teams, as it maximizes the number of front-row attackers (3).
Given that high school players in the age range of 12-15 may not have fully developed the ability to consistently spike from the back row, implementing a 5-1 rotation could potentially limit a team’s offensive capabilities unless they possess an exceptionally tall and astute setter.
For varsity volleyball teams, either a 6-2 or 5-1 rotation can prove effective, depending on the team’s composition and skill level.
How To Memorize Volleyball Rotations?
Understanding precisely where to position oneself on the volleyball court during serve receive can be perplexing at times, especially for younger players who may easily lose track of their designated locations.
I strongly advise dedicating time to studying these rotation diagrams until you grasp the rationale behind each player’s positioning on the court, ensuring adherence to the rules of rotation.
Begin by familiarizing yourself with the 6-2 rotation, as it’s relatively straightforward, requiring memorization of only three distinct serve-receive formations.
With increased exposure to volleyball, these rotations will become increasingly familiar, eventually becoming second nature.
If you find yourself disoriented, your teammates are usually able to assist you in finding your designated position on the court.
Should you encounter significant difficulties with rotations, consider asking your coach to guide your team through them methodically, simulating game scenarios. This approach also serves as an effective means to practice transitioning from serve receive to base positions.
Also Read: How To Run A 4-2 Volleyball Rotation
